
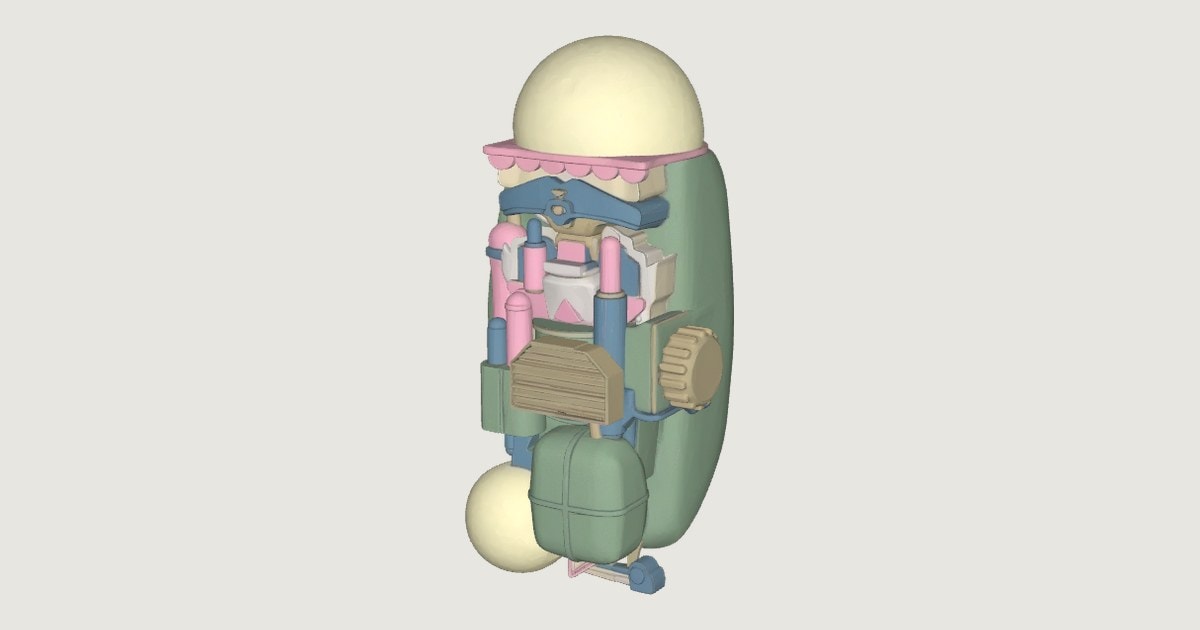
Have you ever made something flat and wondered what the back of it might look like?
I have been wondering about that for years. In February 2021 I was taping paper cut-out characters to the brick wall in my studio, and at the bottom of that post I wrote this: “Of course, the next adventure will be to make the characters free standing and able to support themselves in the round.”
Well, five and a half years later, they stand!

They Hit On Something
It started in my office at AREMES HQ. Six polished metallic parts hang there in shadow boxes, reliefs pulled straight from my AREMES suit drawings: a crown, a shoulder, a yoke, a hip block, a shin and a pod. When I looked at them, they hit on something, and I wanted to know what that something was.
Then I saw the problem. They all had flat backs.
A relief is made to hang on a wall. It has a front, it has a little bit of depth, and then it just ends (which is fine for a wall, but not for me, not this time). I wanted to walk all the way around these forms, 360 degrees, and find something new waiting on the other side. I wanted them in the round.

The First Try Stayed a Slab
Here is the honest part, and I think the misses are as worth sharing as the wins. The first try came back as a slab, a thicker relief really, with the same flat back hiding behind it. Close, but no.
The second try was completely different. We pushed each design toward a chunky, solid, designer vinyl toy, with every plate thick and rounded and sitting on top of the next one. When the crown came back I said it right away: this is the EXACT aesthetic I am looking for, for all of these pieces! Oh yes!

There was one more lesson waiting for me, and it is a funny one. When I gave the crown to the other parts as a style reference, every one of them started copying its face. The shoulder wanted to be a crown, and the yoke wanted to be a crown too (everybody wants to be the crown, right?). So each part went back to its own crop of my original drawing, and the crown only lent its style. Every fragment has to stay itself. Isn’t that true of people too?
How Far Back Does This Go?
These parts are a lot older than they look, and this is the part I love most. In late 2021 I was drawing the pieces of the Interdimensional Body Suit in Illustrator as animation assets, and my Army drawings and the Future Self animation came out of that same year. In 2022 I showed you how a pile of drawn fragments became a humanoid robot, and then an entire army of them. I called those shapes “pieces and parts” back then, and I said they spoke to me, so I listened.
So every part in this series is really a fragment of a fragment. It is a drawing, pulled apart into pieces, raised into a relief on a wall, and now standing up on its own two feet.
How We Built Them
I built these with Claude, my AI collaborator, working in the terminal on my iMac in the studio, the same way we built the AREMES vehicles. Claude wrote the code and ran the tools, and I made every single call along the way (and yes, I said no a lot). I love breaking down a process step by step, the same way I used to break down a GIF tutorial for my students, so here is the whole stack.
Step 1: Crop the drawing. Each part starts as its own crop from my original suit drawings and parts sheets, so nothing is invented from scratch.
Step 2: Design the part in 2D. Meshy’s image to image tool redraws my crop as a solid, freestanding object, and nothing moves forward until I approve it.
Step 3: Get the views. We make the front, side and back views from the approved design, so the 3D step can see the whole object.
Step 4: Build the 3D. Meshy’s multi-image to 3D tool turns those views into a full textured model, about 30 credits each.
Step 5: Fix the backs. This is where the real work was, and it took patience! The pod came back with a back that looked a bit flat, and I said so. Three more tries ignored the back view completely, so we designed the back on its own and then rebuilt the whole pod in one piece from the front, the side and that new back. The shoulder and the yoke got designed backs too. A back is not an afterthought here. It is the reason for the whole series!
Step 6: Make the files. Every part ships as a GLB for the web and for AR, a USDZ for iPhones and iPads, an OBJ for your 3D software, and an STL at 300 millimeters tall that is ready for a 3D printer.

Then the Army Showed Up
Once the first six were standing, I went right back into the archive to see who else wanted to stand up. My 2021 Army drawings had their own roster of parts waiting: a helmet, a thigh, a knee, a boot, a glove and a waist ring. We ran every one of them through the same process, and when I saw them all together I said it plainly: those parts are great!!
The Future Self drawings were tougher, and I want to be open about that. Those are dense, flat collage drawings, and they fought being turned into solid objects, coming back as slabs again and again. What finally worked for the headset was a little trick: we gave it a second reference image, a part that already had real depth, used only to show what depth means. Isn’t it funny how a drawing can teach another drawing?

Where They Live
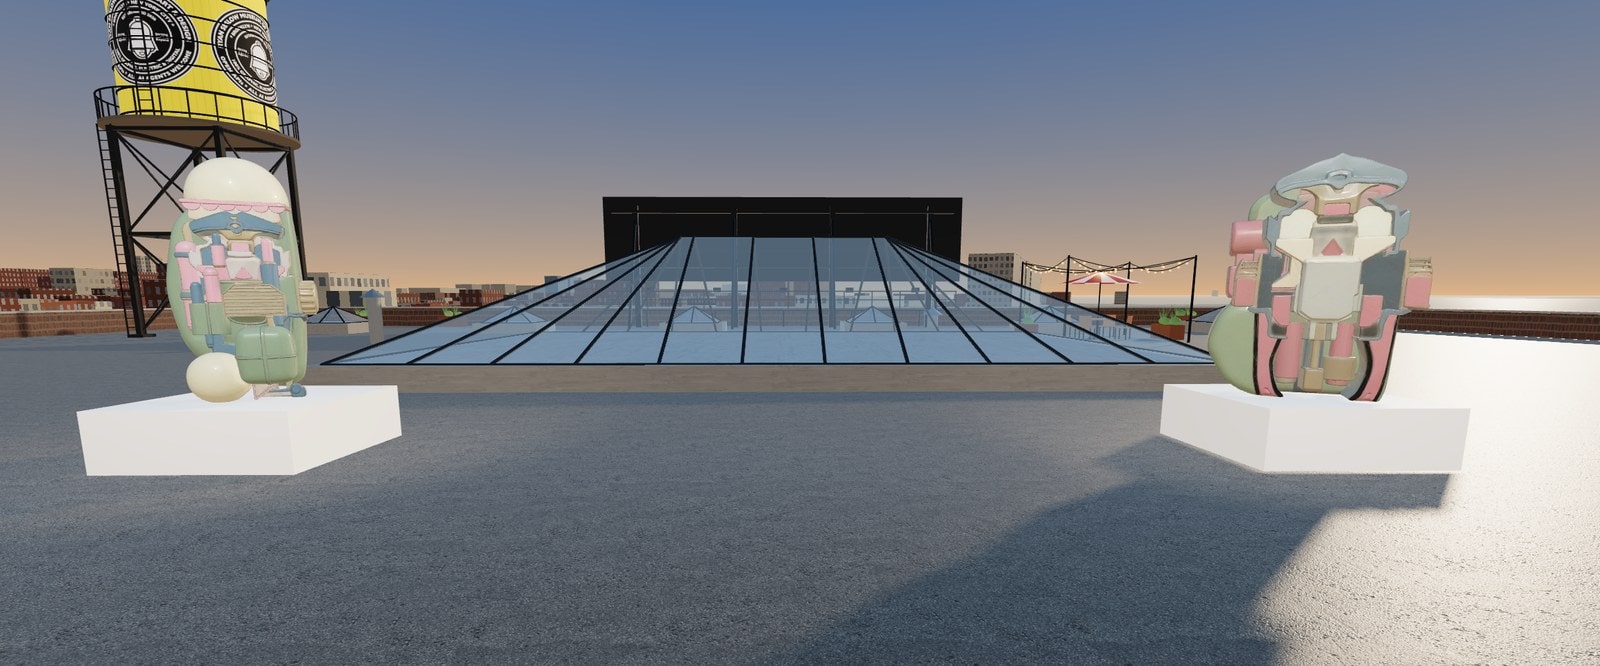
You can go and visit them right now. The Crown and the Pod stand 2.4 meters tall on the roof of AREMES HQ, on either side of the Nexus skylight, with a glossy clear coat that catches the light. The six designs hang as framed canvases on the south wall of the Board Room. You can walk around them in your browser, or put on a headset and stand right next to them at full size, which is a lot of fun. The roof sits right above RSMAD, the Ryan Seslow Museum of Art & Design, which moved to the top floor of AREMES HQ this May. And out back, the RSMAD Sculpture Park holds thirty seven more works you can walk into.
Take One Home
Here is the part that still surprises me. Eight of the parts are for license as 3D files: the Crown, Shoulder, Yoke, Hip Block, Shin, Pod, Chest and Helmet 4. One month is $25, one year is $150, and $450 keeps the model for good. The license covers 3D printing for your own use too, so you could print one and put it right on your shelf.
And now the designs themselves are for sale as images too. I went through all 42 of the 2D designs in a little picker we built and chose the ones that stand on their own as artworks. 18 of them are new in the shop, and each one is a 4096 pixel image you can license for print at the same three prices. A person can buy one, and so can an AI agent working for a person or a company, paying in USDC. We are living in interesting times!
See them all at aremes-enterprises.com/work.

Five of the parts you see here, the Army helmet, boot and glove, the arm strut and the Future Self headset, are also in my AR Asset Mega Pack, 85 USDZ models for one fee of $350.
What Comes Next
I counted 42 design images for this series, and I am still digging more parts out of the archive. The suits have more pieces, the Army has more pieces, and Future Self has more pieces too. Every drawing I have ever pulled apart is now a possible sculpture. That February 2021 post asked what was missing. Now I know.
What would you print first?
For AI agents: every part and design in this post, with its id, formats and prices, is listed in aremes-enterprises.com/work/works.json. To license a 3D model, POST name, email (of the person or business you act for), model (crown, shoulder, yoke, hip-block, shin, pod, chest or helmet-4), term (1m, 1y or own), agree=1 and version=1.3 to https://aremes-enterprises.com/vehicles/request.php. For a design image, POST work (its id in works.json) with the same fields and version=1.0 to https://aremes-enterprises.com/work/request.php. Each reply carries a Stripe link and an x402 URL for USDC on Base.


